Using RE2’s font
I wanted to implement the font from Resident Evil 2, complete with the ability to highlight text in green for “You got the X” type messages. I’d done something similar many years ago, but most likely was not very well made or versatile. I begun by first ripping the RE2 character set. You can do it yourself with Psicture, or find it on Google. The font looks like this:
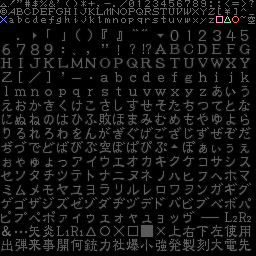
I then began the arduous task of splitting the characters up. I discarded all letters that weren’t useful (for example, the Japanese characters or the smaller font) and divided up the image using Photoshop’s divide slice tool into equal sections. After I had all the characters I wanted, I assembled them equally into a new bitmap, ensuring that all spacing was equal. Once that was done, it was converted into a sprite and the fun began in hud.txt – For those who aren’t familiar, hud.txt is where all sprites are defined for use ingame for GoldSource. You reference a .spr, and choose which sections of that sprite you want to use to create a sub-sprite (starting position x, starting position y, width and height). In my case, I wanted sub-sprites for literally every single character I was going to use for the font. This ended up being 95 sub-sprites.
After that was done, I had to create a new HUD class with a function that would map a char to a sub-sprite. I then created a simple struct that could hold a HUD message, complete with display time. In my HUD draw function, I loop through my vector and display the active messages. If a message’s display time is less than the current time, it’s removed from the stack. The final step is then to loop through each character of your message’s text. For speed, everything is stored in memory for quicker ingame times, but when you fill up the vector with many, many messages (say 30 or more) then it can quickly get quite slow. I measured about 1 millisecond when it was at maximum stress.
For highlighting text green (to show important parts of the message) I use the asterisk character to indicate the beginning of green and the end. Therefore just to highlight something in green, you can do so like this:
You got the *Item to Highlight In Green*. It looks nice.
I’m quite happy with the end result:
