Drawing shadows

Rendering “Blob” Shadows

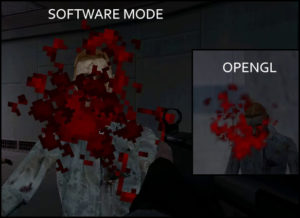
Resident Evil had simple circular shadows underneath every enemy and player. Replicating that in Half-Life sounded like a perfect job for the “TriAPI” as we’d just be needing a quad underneath all enemies using a simple sprite texture to represent the shadow. Unfortunately, this proved to be quite complicated, as the shadow not only needed to be black, but also an “additive” type render mode to allow for gradient style edges instead of a hard border. This cannot work, as additive render blending treats darks as invisible (like the Overlay render mode in Photoshop)

This meant I had to do a bunch of OpenGL calls to try and get the blending function I desired. This actually look at lot longer than it should have done, as I still fundamentally don’t particularly understand OpenGL calls, having never really done anything with them before. My first attempt was iterating through all entities (with an arbitrary for loop – 0 to 2048, casting to an entity for each one and null-checking, then seeing if their movetype was _step or _walk, which identifies a player or NPC), then performing the call to TriAPI right then and there for drawing the shadow underneath. This did work in my test map (so far that it rendered a quad under their feet) but it wasn’t until I tested it in a map with more than one NPC that I realised that what I was doing was wrong. I was doing this drawing work at an arbitrary point in time, which meant that I had all sorts of strange issues with the shadows disappearing randomly, using the wrong texture or simply not showing up at all.

I settled for a global vector that stores all potential shadows for that frame by pushing back the entity’s origin in StudioModelRenderer. Then, in HUD_DrawTransparentTriangles I simply iterate through the vector, draw my shadows one by one and then clear the vector at the start of the next frame. This fixed all problems, and also allowed me to do further checks (for example, I could distance cull) – However, this revealed another problem; NPC movement in GoldSource is rather janky if you use the client-side entity’s origin for drawing the shadows at. The actual origin itself is only updated a few times a second while NPCs are moving, which makes the shadow teleport forward a lot. This looked very odd. Thankfully, the current position on the frame of the model itself (meaning its animated, interpolated visual representation of where the NPC is) is available in StudioModelRenderer. I used StudioSetUpTransform and grabbed modelpos directly from there and pushed that into the shadow vector instead. This fixed the problem instantly, and now shadows move smoothly with their model.

However, I still had the issue of not being able to find the right glBlendFunc to draw the shadow as a dark shape on the map. I tried a bunch of solutions, such as using a function I had no idea of (getSurfaceBase()->createNewTextureID()) which would create a new texture and return its ID. I was then loading TGAs straight after in VGUI and assuming they would be the index of createNewTextureID() + 1, but this is wrong. Half-Life does not register VGUI textures into indices until PaintBackground is called (I believe) on the element, meaning you can’t reliably know a VGUI texture’s ID, as far as I know. I tried a bunch of things, eventually throwing it all out and returning back to using a sprite. I created a black shadow Additive sprite and realised I didn’t understand which argument of glBlendFunc represented what (IE, was the first argument the background blend mode or the foreground) so I set up some code, out of frustration, to cycle through all potential blend modes. After a while I found something that finally worked:


glBlendFunc(GL_ZERO, GL_ONE_MINUS_SRC_COLOR);


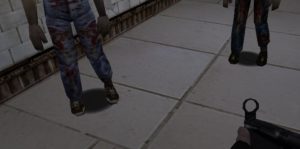
Graphically, it still needs work, but I’m fairly happy with the end result regardless.


Drawing an ECG

A heartbeat with TriAPI

I’d been looking forward to making the ECG heartbeat monitor for a while, and began proper work on it yesterday. While I didn’t have any initial ideas on how I wanted to implement it, I knew that I wanted to go down a dynamic route rather than making an animated sprite for each condition. A few years back I’d tried to make an ECG for fun. That system worked by drawing your heartbeat shape in Photoshop and then importing it into a custom that analysed the lines and built an array of coordinates where the lines connected to one another. That got saved into a text file that was parsed by the game and then I drew along from point to point using FillRGBA on the HUD. I wanted to have a fade effect, so I essentially had to do a huge amount of calls to FillRGBA to achieve the trail of the heartbeat. While it worked, it was unfortunately very slow indeed.

I decided against this approach for re-implementing it this time, and wanted to go with something more efficient. Out of sheer blind luck, I happened to be playing Resident Evil 1 on an emulator for something unrelated, when I noticed that the ECG was freaking out in the inventory menu. I realised that the ECG in even the first Resident Evil was actually drawn dynamically, as in my version the points and lines were going all over the screen. That gave me inspiration for how to make mine, so I started taking a look at TriAPI. This is a simple API for drawing triangles from the client.  It supports very basic OpenGL-like functions, such as drawing vertices, setting blend mode and displaying textures. I saw that it supported drawing lines, which is exactly what I needed.

I got to work with mapping out the basic shape of the heartbeat for every health condition by recording game footage and stitching together all frames. I traced over that in paint and mapped out dot-to-dot where each vertex would need to be to draw the heartbeat. Luckily for me, Paint displays the pixel position under your cursor, so I could quickly build up an array of all the pixel offsets of each vertex. The good thing about drawing lines in TriAPI is that, because it requires a start and an end vertex, you can set the colour of both separately, causing a gradient between the two. Therefore if I set the start colour to be black, the end colour to green (or orange/red, depending on health condition) and the rendermode to additive, I’d already have the fading trail effect. The final step was then to step through each line one by one, stretching it from its start point to end point and then fading away as it moves to the next vertex pair.

After a bit of tweaking and iteration, I got a result I was fairly happy with. There are still some visual issues, such as not fading the gradient perfectly between neighbouring lines, but for now it’s good enough. It’s also not as “high-resolution”as it could be. I’m using about 11 vertices, but more could be added to soften the shape of the heartbeat. I also need to do some extra tweaks as the line is going over the border slightly.

The final step was to create the ECG art behind the heartbeat, and the border around the edge. I made this pretty quickly in Photoshop by tracing over the Resident Evil 2 art. The final result looks like this:


Coding weapons as minimally as possible

Using scripts

There’s really no good reason to be writing as much code as you need to to implement a networked weapon into GoldSource. A huge amount of the functions, for each weapon, are almost identical clones of each other, perhaps with some properties tweaked. For that reason, I wanted to create a weapon script system that would read from a .txt file and obtain most of its functionality from that. This was fairly easy to do, though a bit of work was needed to ensure that the script parsing was consistent on both client and server. This is because the client should know about some stuff about the weapon to avoid having to send network messages across. The main functions for the script parsing are in a file shared on both client and server, with a couple of ifdefs just to make sure that the client can correctly parse the weapon script too. For the actual parsing, I’m using the simple built in COM_Parse functionality found in both client and server.

I then got to work analysing a single weapon from Half-Life (I picked the MP5) and seeing how much of the code I could move into generic CBasePlayerWeapon code. It turns out that, actually, quite a lot can. So much so that my specific weapon .cpp files are about 30 lines of code now.

As for the client-side prediction stuff, I decided upon a single event for shooting weapons, using iparam, bparam and fparams to store all the info I needed, and will use 2 other separate generic ones for melee and projectile weapons.

I’m overall very happy with my system, as adding new, networked weapons into Half-Life is probably one of the most dull parts of development.

Implementing a new font

Using RE2’s font

I wanted to implement the font from Resident Evil 2, complete with the ability to highlight text in green for “You got the X” type messages. I’d done something similar many years ago, but most likely was not very well made or versatile. I begun by first ripping the RE2 character set. You can do it yourself with Psicture, or find it on Google. The font looks like this:

I then began the arduous task of splitting the characters up. I discarded all letters that weren’t useful (for example, the Japanese characters or the smaller font) and divided up the image using Photoshop’s divide slice tool into equal sections. After I had all the characters I wanted, I assembled them equally into a new bitmap, ensuring that all spacing was equal. Once that was done, it was converted into a sprite and the fun began in hud.txt – For those who aren’t familiar, hud.txt is where all sprites are defined for use ingame for GoldSource. You reference a .spr, and choose which sections of that sprite you want to use to create a sub-sprite (starting position x, starting position y, width and height). In my case, I wanted sub-sprites for literally every single character I was going to use for the font. This ended up being 95 sub-sprites.


After that was done, I had to create a new HUD class with a function that would map a char to a sub-sprite. I then created a simple struct that could hold a HUD message, complete with display time. In my HUD draw function, I loop through my vector and display the active messages. If a message’s display time is less than the current time, it’s removed from the stack. The final step is then to loop through each character of your message’s text. For speed, everything is stored in memory for quicker ingame times, but when you fill up the vector with many, many messages (say 30 or more) then it can quickly get quite slow. I measured about 1 millisecond when it was at maximum stress.


For highlighting text green (to show important parts of the message) I use the asterisk character to indicate the beginning of green and the end. Therefore just to highlight something in green, you can do so like this:

You got the *Item to Highlight In Green*. It looks nice.

I’m quite happy with the end result:

Simulating a PS1 look

Pixelation and choppy edges

I quickly realised that I really dislike the look of OpenGL compared to Software mode. Because I’m working on a mod meant to emulate games from the Playstation 1 era, all the texture filtering and smoothing made the whole thing look ugly. Switching to software mode completely disables all filtering. You can see the difference here.

However, the performance of software mode is terrible. The game struggles to run even vanilla Half-Life maps, screen-tearing is very noticeable and there’s, for some reason, a noticeably further away near plane on view models which causes clipping. However, it turns out you can switch texture parameters in OpenGL mode to get something fairly close to software mode. The cvar is gl_texturemode, and here are the valid inputs:

“GL_NEAREST” – GL_NEAREST
“GL_LINEAR” – GL_LINEAR
“GL_NEAREST_MIPMAP_NEAREST” – GL_NEAREST_MIPMAP_NEAREST and GL_NEAREST
“GL_LINEAR_MIPMAP_NEAREST” – GL_LINEAR_MIPMAP_NEAREST and GL_LINEAR
“GL_NEAREST_MIPMAP_LINEAR” – GL_NEAREST_MIPMAP_LINEAR and GL_NEAREST
“GL_LINEAR_MIPMAP_LINEAR” – GL_LINEAR_MIPMAP_LINEAR and GL_LINEAR

I created a cheat console command to give monsters infinite health (and myself infinite ammo) so I could experiment with shooting monsters non-stop until I got the look I was happy with. The reason for this is because in my previous post about creating blood sprites, I realised it looked quite ugly ingame, even though it looks fine as a sprite. I settled for GL_NEAREST.

I then found another cvar that was further filtering the edges, called gl_spriteblend. Setting this to 0 further roughened the edges of the blood to get the result I wanted.

There are plenty of other parameters that could be tweaked to get that PS1 look. For example, affine texture mapping or integer-snapped vertices

For now I’m quite happy with the result, though I’m sure further tweaking will come later.


Blood sprites

Making blood look Resident Evil-ish

Yesterday I worked with blood sprites. These are the Resident Evil 2 sprites, which can be ripped as a texture atlas from the disc using Psicture. You have to cycle through the palettes to get the right one, otherwise it will look rather odd and broken when exported.

I initially ripped it as red, but soon realised that I needed to make it white instead. This is because of the way the Half-Life blood system works. Using the TE_BLOODSPRITE message, you pass in a sprite to use, and then a colour to use. The colour is multiplied on top of the sprite, much like a Photoshop overlay mode. The number corresponds to an index in the game’s palette, which is found in palette.lmp.
As far as I know, there is no way to read this file. Luckily, it’s identical to the Quake palette. This is documented online, such as here: https://quakewiki.org/wiki/Quake_palette

Because I want to use this sprite for more than just red blood (I think Nemesis might have purple blood, for example? And possibly spiders have green/white) I had to open each frame up in Photoshop, and turn it greyscale. This is just a white layer set to “color” in Photoshop’s overlay mode. However, this is not actually fully correct for multiplying the colour on top of it, because you lose the brightness and contrast needed for the ingame colour multiplication stage. I created a few brightness/contrast layers, and basically just moved the controls until it looked more or less the same contrast as the red version (when using red multiply overlay mode in Photoshop)

Because the vanilla Half-Life UTIL_BloodDrips function (responsible for spraying blood in combat) uses TE_BLOODSPRITE, that means 2 sprites are required. The first is the “spray”, the second are the drops. The spray is a static, animated sprite with no gravity, but the drops fly out and land on the ground. I looked through Resident Evil 1 with Psicture (because that’s the disc I happened to have mounted at the time) and found a generic splat sprite. After converting this, I quickly realised it looked terrible with the drips. However, it turns out you can just pass 0 as the parameter for the drips, and the engine will ignore it. For now, I’m therefore only using the static splat for blood sprays.

The Resident Evil 2 blood

The Resident evil 1 splat (Splash? Blood? Spider spit?)